The tuning of a piano
Tuning a piano the classical way is a very complicated process. One has to possess the skills, to handle the tuning hammer in the correct manner and to leave the tuning pin in a stable position. It takes time and practice to master these skills. It is however even more difficult to determine the correct pitch of the strings. Many instruments can be tuned using a simple tuning device. Each tone is then tuned exactly to a predefined frequency. This method can't be used tuning a piano. The result would make the piano sound harsh and out of tune. The reason for this lies in the way stringed instruments produce their sound.
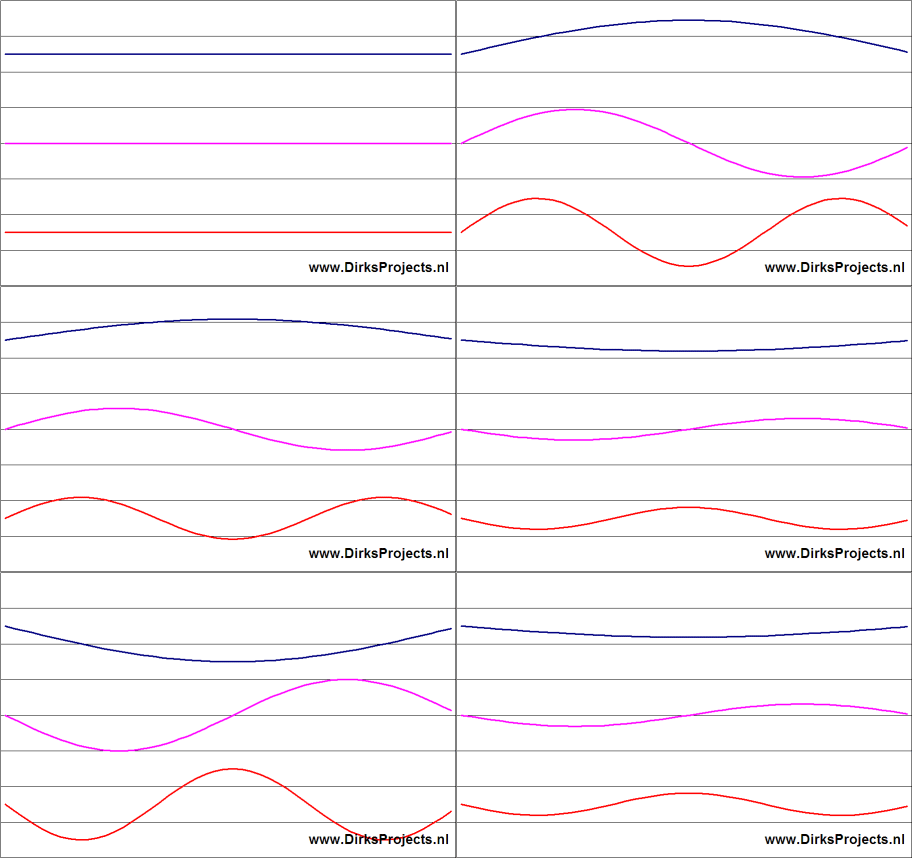
A string can vibrate in several ways. It can vibrate in one whole section ; the middle of the string then oscillates and the ends are fixed. It can vibrate in two sections; the middle and the ends are then fixed and the string oscillates on 1/4 and on 3/4 of the length. This way a string can also vibrate in three, four, five, etc. sections.
All these vibrations occur at the same time in the string. Each vibration has its own frequency. A struck string therefore provides several frequencies at the same time. These are called the strings' harmonics. When these harmonics are exactly 2, 3, 4 and 5 times the base frequency, then a simple tuning device can be used. For a piano this is unfortunately not the case. For a piano these factors are not exactly 2, 3, 4, and 5. The exact values of these factors determine the base frequencies of the piano strings, that is when the piano sounds most harmonic or "in tune". In practice it shows that the low tones need to be tuned a bit lower. The high tones need to be tuned a bit higher. The rate in which the low tones need to be tuned lower and the high tones higher is called the stretch of the piano. The stretch depends on multiple factors. The dimensions of the piano are important (the string lengths e.g.), but also the diameter, the material and the weight of the strings. This means that each piano has to be tuned differently to achieve its optimal sound and performance.
There are already tuning devices that take this stretch into account. You can choose a stretch at setup, where a small stretch is chosen for a large piano and a large stretch for a small piano. Such tunings devices can take the piano to an almost optimal tuning. But the specific design of the concerning instrument is not taken into account and therefore some of the factors, that decide the stretch, are left out. Because of this, the piano will not sound optimal and it will still be necessary to determine the optimal stretch "by ear".
The piano technician does this by striking a lot of intervals (two keys at the same time) and aligning them. To do this properly, a lot of experience is an absolute necessity. The difficulty lies in the fact that you cannot tune the intervals entirely pure and the rate of purity is different for each and every interval.
When an interval is not entirely correct, one of both notes will be adjusted accordingly. This note however is also part of several other intervals. Therefore all these intervals will have to change as well. All this produces a large complex puzzle that has to be solved.
Dirk's Piano Tuner solves this puzzle for you. In Dirk's Piano Tuner all strings will be recorded by playing them all one by one, only one string per tone, the remaining strings muted. The tuning (and so is the stretch) is determined by the computer using these single string recordings. The tuner not only records the fundamentals, but also the harmonics. After this "single string" recording, the tuner has all the data needed to calculate the optimum base setting of all strings. The tuner calculates then the purity of all possible intervals and aligns them. After this the strings can now be tuned one by one to the resulting tones from the tuner. The tuner recognizes the struck string automatically and shows how much the string deviates from its ideal pitch. The muted strings are later on tuned equal to the earlier tuned string in the same string set. After tuning all strings the piano has been tuned with the optimal stretch. The piano now sounds as pure as possible for that particular piano. Each string needs only to be tuned once and it is no longer necessary to finish the tuning by ear.
Dirk's Piano Tuner
Tune a piano yourself to a professional standard
Compatibility
Microsoft

- Desktop
- Laptop
- Netbook
- Tablet
- Phone
- Pocket PC
- Windows 11
- Windows 10
- Windows 8.1
- Windows 8
- Windows 7
- Windows Vista
- Windows XP
- Windows ME
- Windows 2000
- Windows 98
- Windows Phone
- Windows RT
Apple

- iMac
- Mac Pro
- Mac mini
- MacBook
- Intel cpu
- M1, M2 & M3
- iPad
- iPhone
- Sonoma
- Ventura
- Monterey
- Big Sur
- Catalina
- Mojave
- High Sierra
- Sierra
- El Capitan
- Yosemite
- Mavericks
- Mountain Lion
- Lion
- Snow Leopard
- Leopard
- Tiger
- iOS iPhone
- iOS iPad
The tuner is available in the following languages:
The trial version
The trial version is meant for getting a good idea of the possibilities of the tuner. As with the full version, the trial version can record all notes. After that, the optimal stretch can be calculated. The trial version calculates the optimal frequencies of all As (A0 - A7) and all Es (E1 - E7). These tones can then be tuned. All the tones in between cannot be tuned. This way it is possible to tune a series of intervals over the entire range of the piano:
Octaves: A0-A1, A1-A2 etc. E1-E2, E2-E3 etc.
Fifths: A0-E1, A1-E2 etc.
Fourths: E1-A1, E2-A2 etc.
Extension modules
The tuner can be extended with modules. These extension modules add extra functionality. At this moment there are no extension modules available yet. Check the Internet site for new extension modules.
A number of important terms
- Frequency
the number of waves per second of a tone (pitch).
- Sound
the total range of wavelengths that can be perceived by the human ear.
- Tone
sound with a fixed pitch.
- Note
notation indicating a tone with a specific pitch and length.
- Scale
increasing or decreasing sequence of tones in a fixed order.
- Pitch
the perceived frequency of a tone. This is the fundamental frequency.
- Fundamental tone or tonic
the perceived pitch. The lowest tone of the collection of tones that make up a sound.
- Overtone
a tone in a sound that has a higher frequency then the tonic. The overtones are multiples of the tonic.
- Beat(ing)
a beat(ing) occurs when two tones with a small difference in pitch sound at the same time.
- Interval
The difference in pitch between two tones.
- Semitone
the smallest musical interval in western music. An octave exists of twelve semitones. In an equal temperament all semitones are evenly divided in frequency. On a piano the interval between two adjacent white keys, is one semitone, if there is no black key in between. If there is a black key in between the adjacent white keys, then the interval between the two white keys is two semitones. In that case the interval between the white keys and the black one is one semitone. The interval between a tone and the same sharp tone (for example C and C#) is always one semitone.
- Octave
the difference between two tones where the second tone has twice the frequency of the former.
1 Octave = 12 Semitones.
- Tuning or temperament
the way in which the combination of frequencies for a specific range of tones on an instrument are selected. In Western music the equal temperament is most popular. Other temperaments are for example: the just intonation, the Pythagorean tuning, the mean tone temperament, the well temperament and the 31 equal temperament.
- Chromatic scale
a chromatic scale is a scale that contains all twelve semitones within an octave:
c – c# – d – d# – e – f – f# – g – g# – a – a# – b (the white and black keys of a piano)
- Half-tone and whole-tone steps
a half tone step is equal to an interval of one semitone such as the interval between two adjacent white keys on a piano without a black key in between. A complete tone step is equal to an interval of two semitones such as the interval between two adjacent white keys on a piano that do have a black key in between.
- Diatonic scale
a diatonic scale is a scale with half and whole-tone steps:
C major: c – d – e – f – g – a – b (the white keys on a piano or the buttons on a diatonic accordion)
C minor: c – d – eb – f – g – ab – bb
- Hertz
unit for frequency.
1 Hz = 1 wave per second.
- Cent
logarithmic unit for the difference in pitch with respect to a tone in the scale.
1200 Cent = 1 Octave.
100 Cent = the distance between 2 successive semitones in an equal temperament.
- Frequency spectrum
all frequencies that occur in a sound. The frequency spectrum can be presented in the form of a graph.
- Bisonoric
the term 'bisonoric' is used to indicate to that a key of an accordion-like instrument generates a different tone when closing or opening the bellows. Examples: bandoneón, squeeze box, harmonica.
- Tuning table
a work table with all kinds of supplies for tuning the reeds of an accordion.
Choice and placement of the microphone
The accuracy of the microphone
For the tuner only the frequency of the measured sound is important. The sound volume does not matter. The sensitivity of the microphone is not important. The accuracy of the measured frequency is. This is however easily sufficient in any microphone.
Externally connected or built in
A built in microphone such as those present in the most laptops, is not always usable. It catches more surrounding noise than an externally to the sound card connected microphone. The case of the laptop catches up sounds and vibrations and passes them on to the microphone. The cooling fan of the laptop is an important source of surrounding noise. A built in microphone can also often not measure the lowest frequencies. Another, much larger, disadvantage of the built in microphone is that it is impossible (or difficult) to position it right with respect to the instrument. An external microphone, which is connected with a wire to the sound card, can simply be placed on the desired location.
The distance from the microphone to the piano
The closer the microphone is placed to the piano, the smaller the influence of the background noise in relation to the sound to record. So a shorter distance will improve the measurement. A distance of less than three feet gives the best result.
Digital effects
Some microphones are supplied with software (so-called drivers) which can modify the sound signal by using digital effects. These are effects such as 'echoes', 'hum filters', 'stereo enhancement', 'direction sensitivity' and 'noise suppression'. These effects can distort the recorded sound as a result of which the tuner will not function properly. Therefore effects have to be disabled. On the other hand, microphone settings such as 'boost', 'sensitivity', 'volume', 'gain' and 'balance' are of no consequence.
Conclusion
An external microphone with a cable connected to the computer is the preferred configuration, because it can be easily placed in a proper location. That means that a simple microphone connected to your computer's soundcard will suffice. The frequency range of such a really cheap microphone is in most cases not known. A high quality dynamic microphone will give better results, especially in the lower frequencies. Generally spoken a USB microphone will do too. In that case, the internal sound card of the computer is not used, which can be an advantage. The much more expensive condenser microphones are usable, but they won't give you a better tuning-result. At all times, digital effects in the microphone software have to be disabled!
The first use
Tooltips
Hovering the mouse-cursor above a button or a window, will show a "tool tip". A tool tip is a small text box with explanation about that particular button or window.
Select the sound input
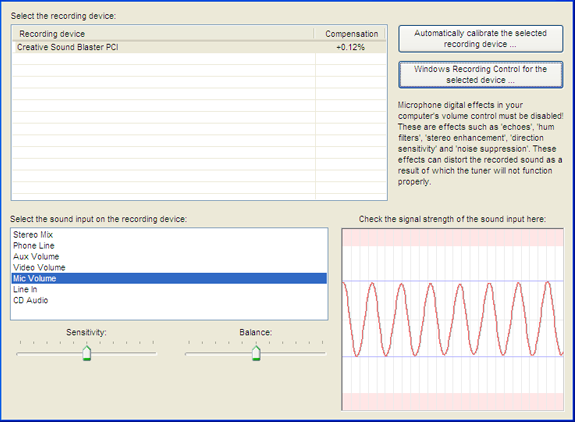
To be able to use the tuner it is necessary to select and configure the desired sound input channel. Generally this will be a microphone. When you start up the tuner for the first time the configuration screen is shown automatically.
The left part of the configuration screen above is important for selecting and configuring the sound input. At 'select the recording device' you select the sound card. The different sound inputs of the selected sound card are enumerated at 'select the sound input in the recording device'. Here you select the sound input to use.
The resulting signal from the selected input is shown in the graph at bottom right. The tuner works best when the input signal is as strong as possible, but it should stay clear of the top and the bottom of the graph to avoid distortion. The strength of the signal can be controlled by moving the 'Sensitivity' slider. When a microphone is selected and its signal is too weak, the check mark 'Microphone boost' can be set to amplify the signal more.
If you have a stereo input with a "Balance Slider", you'll have to set its slider in the middle.
The button 'Windows Recording Control for the selected device' opens the sound input configuration screen of Windows. This screen is normally not necessary.
Sometimes a hum (50 or 60 Hz) is audible on the input. This is generally caused by either bad earthing or a bad power supply. It can be taken out by checking one of the hum filter boxes. Not using these filters can result in unwanted detection of certain tones e.g. G1 (49Hz), A#1 (58,27Hz) or B1 (61,74Hz).
The tuning process with Dirk's Piano Tuner
Some information first
The automatic key detection
Dirk's Piano Tuner automatically detects the key that you hit. The detected key will be marked green on the screen-keyboard. Right after hitting or releasing a key you might see another key turn green shortly. This is normal behavior and you can ignore that.
Striking the keys when tuning
In the piano, while hitting a key, you'll be hitting a string set, i.e. one, two or three strings, depending on the height of the tone. For that reason, please take note of the following.
- When hitting a key, only one string of the set should vibrate. It is of vital importance that the remaining strings in a set are muted completely and are not allowed to vibrate in any way. If this muting is not done properly, it will influence calculation of the optimal stretch, resulting in a stretch that is not optimal.
- It is also of vital importance that you use the piano keys to strike the string(s), because the hammer that is connected to the key is mounted in the most ideal position to do this. If the string is hit, plucked or sounded otherwise, the harmonics produced by the string will be quite different and will cause a less optimal stretch.
- During recording (the record button depressed) the key has to be held down until the relative screen-key turns red, which tells you that the recording is successful.
- During the process of tuning (the record button not depressed) a stricken key has to be held down until the key turns green on screen, which tells you the tuner has recognized the tone. Once this has been done you can hit the key repeatedly.
The tuning process with Dirk's Piano Tuner
The actual tuning of a piano using Dirk's Piano Tuner
- Start up Dirk's Piano Tuner on your computer. Then connect and set up the microphone. In case of a grand piano, the microphone can be placed, on the floor under strings, the microphone pointing upwards. In case of an upright piano it can be placed near its pedals, the microphone pointing at the piano. Place the microphone on e.g. a rubber pad or a cushion, so it won't pick up vibrations from the floor.
- On your screen, check in the upper left corner if the right microphone input is selected.
- Provide a quiet environment with minimal interfering ambient noise. Especially continuous, monotonous sounds, like the sound of a fan or an aquarium pump will spoil the tuning.
- To tune a piano, first record all its tones. In the main screen of the tuner, push the 'Record' button and hit each piano key (one by one, from low to high), leaving at least two seconds of silence in between.
- Each time, keep the key down until the tone is recorded and the corresponding key in the main screen of the tuner turns red.
- While recording the piano, the lower two gauges stay blank. The reason for this is that the optimal stretch is not yet known so the tuner cannot determine the deviation in respect to the optimal stretch yet.
- If, during the recording process, the tuner picks up on a background sound, it is possible that an unwanted recording is made. In that case the corresponding key will turn red. To remove such a recording, click on the concerning key with the right mouse button. The red color will disappear. After that and only after that, the key can be recorded again. After all the keys have been recorded (all keys are a steady red), click the "Stretch" button.
- As soon as all tones are recorded, go to the Optimal Stretch Screen by clicking on the 'Stretch' button in the main screen of the tuner.
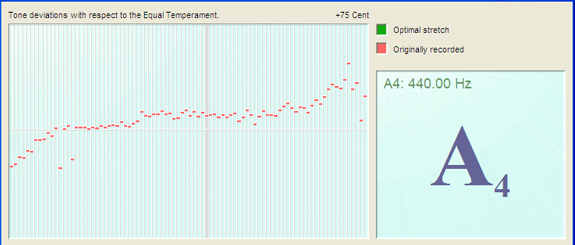
- Each vertical bar in the graph you see here represents a piano key. Each recorded tone shows its deviation from the equal temperament with a short red line. The horizontal line in the middle represents the equal temperament. If all tones are recorded, calculate the optimal stretch by clicking on the 'Calculate Optimal Stretch' button.
- The optimal stretch for the recorded piano is now being calculated. This will take a few minutes. During this time, the computer compares millions of combinations of harmonics. The resulting optimal stretch is shown by the short horizontal green bars. You will see the green lines jump up or down, getting closer to the ideal tuning. The original recorded values are still represented by the horizontal short red bars. This way you can see the difference between the current and the optimal stretch. The bar at the bottom of the window shows how far you have progressed.
- You need to record a piano only once. After the optimal stretch has been established, you can save it by clicking the "Save Recording" button. When, in the future, you need to tune that particular piano again, you can recall the appropriate "optimal stretch" again by clicking the "Load Recording" button and selecting the relevant file.
- The final graph showing the "optimal stretch" for that piano, looks a little bumpy. This is all right. It is the "purity" of the intervals that define the final sound of the piano. The frequencies of the tonics are less important.
- The piano can now be tuned using the resulting "optimal stretch". Close this window (Alt-F4 or the little red cross top right). The screen with the graph will disappear and the main screen will reappear.
- Now you have sorted out the "optimal stretch", you can start the actual process of tuning your piano. You start in the middle of your keyboard, normally C4 and start your way up to the right, into the high section, string set by string set. After that you start from the middle to the left into the low section. Mute all but one string(s) in the string set. Strike the corresponding key and observe the red needle in the bottom part of the window. This needle responds directly to the movement of the tuning hammer. When the needle reaches zero, the string is perfectly tuned. However a string can never be tuned perfectly, which is really not necessary either.
- Sometimes the needle swings a bit around the zero. The scale behind the needle is expressed in Cents. 100 Cent at key A0 corresponds to 1.59 Hertz. 100 Cent at key C8, however, corresponds to 241.92 Hz. If the tuned string has a deviation of less than plus or minus 0.1 Hertz, that deviation will not be audible.
- Before you start tuning using the hammer, wait until the red needle shows the actual amount of deviation. This takes about half a second, but it'll give you the most accurate reading. Remember that the last movement of the tuning hammer should be in the direction of lowering the tone. This makes sure that the tension in the string sections is evenly distributed. If you fail to do this, the string will detune after a short while. This takes care of one string in the set.
- You now have to tune the other strings in the string set, to the one you have just tuned using Dirk's Tuner. In case of a three string set, first de-muffle one string and tune the other equal to the tuned string, by listening to the beats. Then tune the third one to the other two. This is relatively easy, because you can hear the deviation in beats very clearly. If you like, you can also tune the last two strings using Dirk's Piano Tuner.
- Having done all of the above, the piano is now tuned according to the optimal stretch. You can check the various intervals and chords by ear.
The tuner's features
The input signal
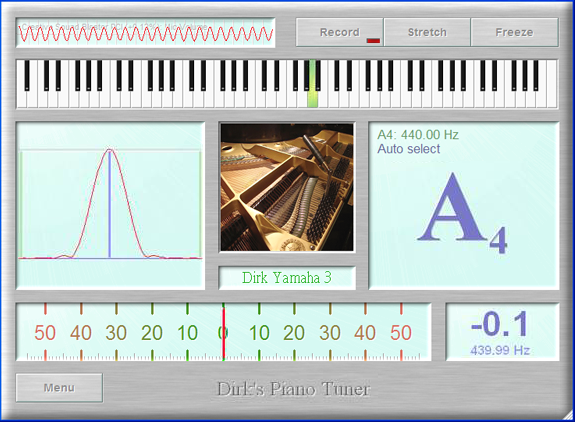
The sound signal the tuner uses for its measurements is shown in waveform in the top left corner of the tuner window. The height of the wave indicates the strength of the input sound. If the sound becomes too strong for the wave to fit the window, it will be scaled down. The name of the sound input that is chosen in the settings screen (Menu - Tuner Settings) is also shown in this window. In this window you can check if the input signal is present.
The keyboard
When the tuner detects a tone, the relative key is marked green on the screen-keyboard. The keys of the keyboard run from the A0 up to and including the C8. The character is the name of the tone and the digit is the octave number.
The detected tone
The detected tone is shown as a character with an octave number and if applicable a sharp sign in the tone window of the tuner (bottom right).
The frequency of the tone is shown in the top left corner above this character. Please note that this is not the measured frequency, but the target frequency.
The frequency spectrum of the detected tone
The tuner shows the frequency spectrum of the detected tone graphically in the frequency spectrum window. The horizontal axis represents the frequency and vertical axis represents the strength of the frequencies. A struck string causes a peak in the frequency spectrum and the red waveform represents the frequency spectrum of the detected tone. The tuner detects the peak in the red line and marks it with a blue vertical line. The vertical grey line indicates the frequency from the scale of the detected tone.
The deviation of the string's frequency
The string's deviation from the target frequency is shown numerically and is also represented by a moving red needle (bottom part of the window). The absolute frequency in numbers is shown below the deviation.
The selected tuning
The tuner shows the tone's deviation from the selected (and previously loaded) tuning. The deviation is zero when the string's frequency matches exactly the frequency of the selected target tuning's tone. The selected tuning is displayed in the middle text box. The optimal stretch is calculated by the tuner itself and is unique for the each individual piano.
Freeze the tuner
The movement of the tuner needle, numbers and graphs can be stopped, to enable easier reading. Just click the "Freeze" button. Hitting the spacebar will do the same.
Enlarge the tuner to a full screen
To get full visual access to the tuner window, the window can be enlarged to a full screen. This is especially helpful when your screen is positioned at a distance.
Tuner Settings
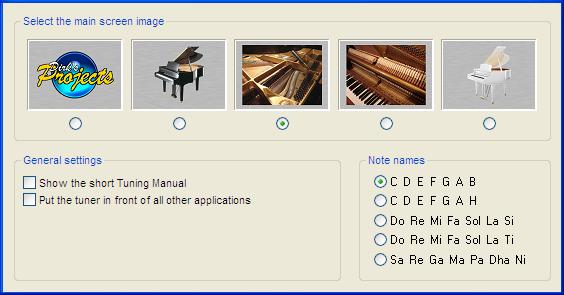
Selecting the image displayed on the main screen
The top row shows 5 different images. Here you can select the image that is displayed in the main tuner window.
Disable the large tool tips
When using Dirk's Piano Tuner, a so-called "Tooltip" is shown when hovering over a component of that window, e.g. button, window, slider, check mark, text, etc. This tooltip is a small text box containing an explanation about the component under the cursor. These help texts give important information about the various functions in the tuner and are therefore very useful. For the experienced user, these large tooltips can be disabled, by checking the checkbox "Disable large tooltips."
The tuner settings window can be opened by clicking "Menu - Tuner Settings". This settings screen can also be opened by clicking the image in the middle of the tuner.
The accuracy of the tuner
The maximum accuracy in Hertz and in Cent
The accuracy of the Tuner is better (less) than 0.1 Hertz (waves longer than 10 seconds). The accuracy in Cent gradually changes over the range of the tuner because a Cent is a relative unit. The interval between two successive tones in Hertz increases as the pitch gets higher while the interval in Cent is by definition (always) 100. Some values of the accuracy of the tuner in Cent: C1: 5.2 Cent, C2: 2.6 Cent, C3: 1.4 Cent, C4: 0.6 Cent, C5: 0.4 Cent, C6: 0.16 Cent, C7: 0.08 Cent, C8: 0.04 Cent. So in Cent, the tuner gets therefore more accurate as the pitch gets higher.
Detectable pitch differences
The smallest by human ear detectable pitch difference is approximately 2 Hertz. The accuracy of the tuner of 0.1 Hertz is many times better. This high accuracy is necessary to measure the beatings between two strings. A difference in beating of more than approximately 0.1 Hertz is already detectable by the human ear.
Automatic calibration
The tuner uses the sound card for its measurements. To compensate possible errors in the sound card, the tuner carries out an automatic calibration. Manual calibration such as those often possible on conventional tuners (with a screw for example), is not necessary. Because of this the measurements of the tuner are always accurate enough.
The internal accuracy
The tuner shows the measured errors with 1 or 2 decimal places (digits behind the comma). The tuner calculates with 7 decimal places internally. Right before an error is shown, it is rounded on 1 or 2 decimal places.
Some photos
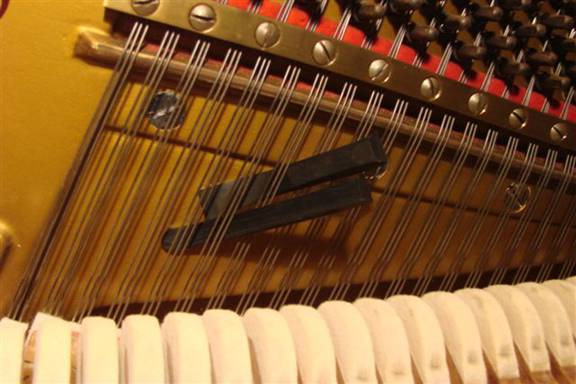
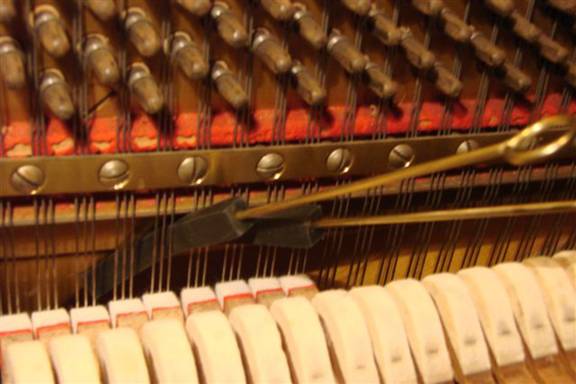
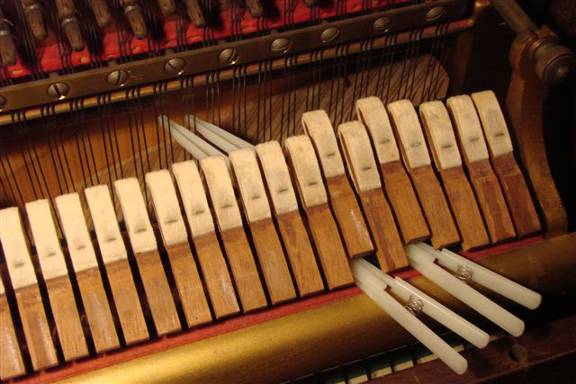
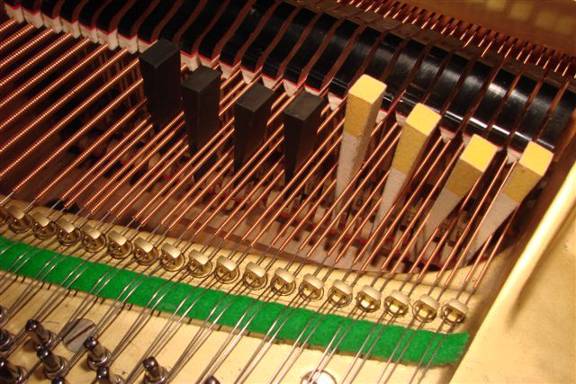
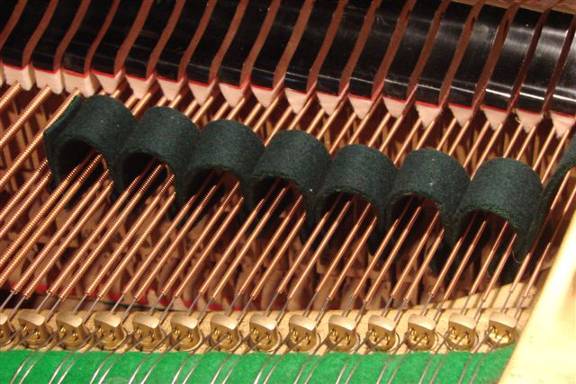
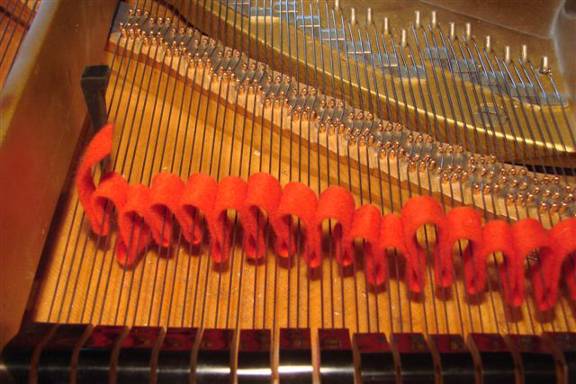
Tools to mute strings for piano and grand piano
Muting of a three string string-set in the middle region (piano)
Muting of a three string string-set in the octave (7) below the highest (piano)
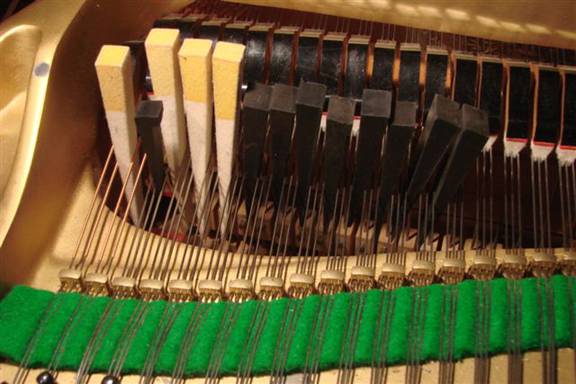
Muting of a series of three string string-sets on a grand piano using multiple mutes
Muting of two two string string-set using a mute (grand piano)
Muting of a three string string-set on a grand piano using two mutes
Muting of a three string string-set in the highest octave (piano)
Muting of a series of two string string-sets on a grand piano using multiple mutes
Muting of multiple two string string-sets using a temperament strip (grand piano)
Muting of multiple three string string-sets using a temperament strip (grand piano)


